

There are times for security reasons when you might want to limit access to a specific file or directory by using a login and password. One reason to do this would be to protect your WordPress installation, by limiting access to the wp-login.php script. Adding the following to your webpage root .htaccess file will require login access to the wp-login script:
<FilesMatch "wp-login.php">
 AuthType Basic
 AuthName "Secure Area"
 AuthUserFile "/home/example/.htpasswds/webpage/wp-admin/.htpasswd"
 require valid-user
 </FilesMatch>
Additionally you can protect all files within a specific directory by putting the .htaccess file in the directory (for example /wp-admin/ directory in the case of WordPress) you want to password protect with the following:
AuthType Basic
 AuthName "Secure Area"
 AuthUserFile "/home/example/.htpasswds/webpage/wp-admin/.htpasswd"
 require valid-user
You just put the above information into a “.htaccess” file and upload to your location of choice. To create the “.htpasswd” file with users and passwords, please use the following online utility: http://www.htaccesstools.com/htpasswd-generator/
 (No Ratings Yet)
There are times for security reasons when you might want to limit access to a specific file or directory by IP address. One reason to do this would be to protect your WordPress installation, by limiting access to the wp-login.php script. Adding the following to your webpage root .htaccess file and it will limit access to the wp-login script to a single IP address:
(ensuring you replace 100.100.100.101 with your own IP address)
<FilesMatch "^wp-login.php$">
	Order Deny,Allow
	Allow from 100.100.100.101
	Deny from all
</FilesMatch>
Or to protect the administrator login page for Joomla instead of WordPress add:
<FilesMatch "^administrator/index.php$">
	Order Deny,Allow
	Allow from 100.100.100.101
	Deny from all
</FilesMatch>
Additionally you can protect all files within a specific directory by putting the .htaccess file in the directory (for example /wp-admin/ directory in the case of WordPress) you want to protect with the following:
Order Deny,Allow
Deny from all
Allow from 100.100.100.100
100.100.100.101, 100.100.100.102
You can also accomplish the above by using rewrite rules inside the .htaccess file, for example:
Single IP address access
To allow access from a single IP address, replace 123\.123\.123\.123 with your own IP address:
RewriteCond %{REQUEST_URI} ^(.*)?wp-login\.php(.*)$ [OR]
 RewriteCond %{REQUEST_URI} ^(.*)?wp-admin$
 RewriteCond %{REMOTE_ADDR} !^123\.123\.123\.123$
 RewriteRule ^(.*)$ - [R=403,L]
Multiple IP address access
To allow access from multiple IP addresses, replace 123\.123\.123\.xxx with your own IP addresses:
RewriteCond %{REQUEST_URI} ^(.*)?wp-login\.php(.*)$ [OR]
 RewriteCond %{REQUEST_URI} ^(.*)?wp-admin$
 RewriteCond %{REMOTE_ADDR} !^123\.123\.123\.121$
 RewriteCond %{REMOTE_ADDR} !^123\.123\.123\.122$
 RewriteCond %{REMOTE_ADDR} !^123\.123\.123\.123$
 RewriteRule ^(.*)$ - [R=403,L]
If your IP address changes, or you have a very large amount of possible IPs you’re connecting from, you can protect your WordPress site by only allowing login requests coming directly from your domain name. Simply replace example\.com with your own domain name
RewriteCond %{REQUEST_METHOD} POST
 RewriteCond %{HTTP_REFERER} !^http://(.*)?example\.com[NC]
 RewriteCond %{REQUEST_URI} ^(.*)?wp-login\.php(.*)$ [OR]
 RewriteCond %{REQUEST_URI} ^(.*)?wp-admin$
 RewriteRule ^(.*)$ - [F]
(No Ratings Yet)You can manage your databases by utilizing our web based online database tool at: https://database.imageway.com
(No Ratings Yet)

Yes, you can block visitors per their IP address or redirect them based on their country. Countries will have a specific IP address range (or country code), and you can use that information to block or redirect all or some of their traffic. There are more than one way to do this:
The preferred and fastest method for checking against the country the visitor is coming from is to use GeoIP if your web server supports it. The Imageway web server does support the use of GeoIP. Here are some example scenarios that can be added to your .htaccess file:
# Redirect one country RewriteEngine on RewriteCond %{ENV:GEOIP_COUNTRY_CODE} ^CA$ RewriteRule ^(.*)$ http://www.canada.com$1 [L] # Redirect multiple countries to a single page RewriteEngine on RewriteCond %{ENV:GEOIP_COUNTRY_CODE} ^(CA|US|MX)$ RewriteRule ^(.*)$ http://www.northamerica.com$1 [L] # Redirect multiple countries to a single page if they don’t match RewriteEngine on RewriteCond %{ENV:GEOIP_COUNTRY_CODE} !^(CA|US|MX)$ RewriteRule ^(.*)$ http://www.website.com/not-allowed [L] |
Visit https://dev.maxmind.com/geoip/legacy/codes/iso3166/ for a listing of country codes.
Searching the internet, we found a unique solution for blocking countries and regions via IP addresses with some PHP coding.
Visit http://timtrott.co.uk/block-website-access-country for more details about this method, including example code.
Another way to do it is to block IP ranges in the .htaccess file for your site.
For a current list of IP addresses by country, please visit http://www.countryipblocks.net/
On the resulting page, click the “.htaccess deny” link for the desired country. This is the exact code you should paste in your .htaccess file. Usually the .htaccess can be put in your top level webpage/ folder so it can protect all your subdirectory paths.
This method is not the preferred method for countries with large IP ranges since if your .htaccess file is very large and takes too long for our web server to load, then it will be skipped. The preferred method would be to use the GeoIP example above since it keeps the .htaccess very small, and uses a internal memory database for lookup.
To block multiple IP addresses, list them one per line by editing your .htaccess file, for example:
|
You can also block an entire IP block/range. Here we will not specify the last octet in the .htaccess file.
|
This will refuse access for any user with an address in the 127.0.0.0 to 127.0.0.255 range.
Instead of using numeric addresses, domain names (and subdomain names) can be used to ban users.
|
It bans users with a remote hostname ending in isp_name.com. This would stop all users connected to the internet via isp_name.com from viewing your site.
If you only want to allow certain IPs to connect to your website, you can set an option for deny from all, which will deny everyone.
This must be done by coding your .htaccess file as follows:
deny from all

allow from 70.24.291.52

allow from 216.130.49.223 #my house
Using .htaccess to block an entire range or name is likely to lock out innocent users. Use with caution.
 (2 votes, average: 5.00 out of 5)
What is mod_rewrite? Mod Rewrite allows you to change the URL that everyone sees when they visit your domain or a specific address. Just add the code to your .htaccess file (typically the one inside webpage/).
Please remember we do not offer support to code this, nor do we promise to make your code work. Some of these codes work in combination, and some do not.
EXAMPLES
Guides to dot-htaccess coding:
javascriptkit.com
apache.org
modrewrite.com
Great resource for mod rewrite lessons.
Great resource for mod rewrite examples.
(No Ratings Yet)When a search engine crawls (visits) your website, the first thing it looks for is your robots.txt file. This file tells search engines what they should and should not index (save and make available as search results to the public). It also may indicate the location of your XML sitemap. The search engine then sends its “bot” or “robot” or “spider” to crawl your site as directed in the robots.txt file (or not send it, if you said they could not).
Google’s bot is called Googlebot, and Microsoft Bing’s bot is called Bingbot. Many other search engines, like Excite, Lycos, Alexa and Ask Jeeves also have their own bots. Most bots are from search engines, although sometimes other sites send out bots for various reasons. For example, some sites may ask you to put code on your website to verify you own that website, and then they send a bot to see if you put the code on your site.
Read Google’s official stance on the robots.txt file.
The robots.txt file belongs in your document root folder. The document root folder name we use for our hosting is “webpage/”.
You can simply create a blank file and name it robots.txt. This will reduce site errors and allow all search engines to rank anything they want.
If you want to stop bots from visiting you site and stop search engines from ranking you, use this code:
#Code to not allow any search engines!

User-agent: *

Disallow: /
You can also prevent robots from crawling parts of your site, while allowing them to crawl other sections. The following example would request search engines and robots not to crawl the cgi-bin folder, the tmp folder, and the junk folder and everything in those folders on your website.
# Blocks robots from specific folders / directories

User-agent: *

Disallow: /cgi-bin/

Disallow: /tmp/

Disallow: /junk/
In the above example, http://www.yoursitesdomain.com/junk/index.html would be one of the URLs blocked, but http://www.yoursitesdomain.com/index.html and http://www.yoursitesdomain.com/someotherfolder/ would be crawlable.
View more robots.txt codes here.
Read about changing Google’s crawl rate.
(No Ratings Yet)We currently offer the File Transfer Protocol (FTP) as the main interface to the website files located on our systems. In addition we support encrypted FTP (Implicit and Explicit) if you need additional security when using FTP to transmit data. You can use FTP to upload and download your website files using the FTP login information that was provided in your welcome email (contact us if you lost this information). The FTP client software we suggest for our customers is “FileZilla“, which is available for multiple Operating Systems. The only prerequisite we have is that “Persistent Mode” is turned on, which is normally the default setting.
We do not offer a control panel with website disk usage reports that is available on a global basis due to security and availability concerns. If you wish to have a disk usage report available for your website, you can easily use FTP to upload your own disk usage report software. We currently suggest the following software for disk usage reports:
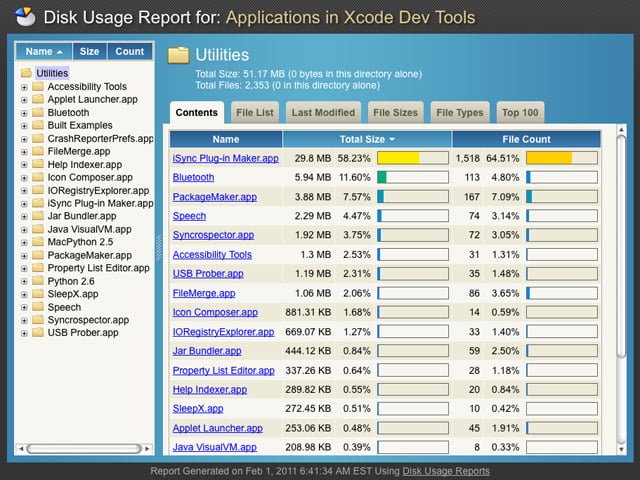
Disk Usage Reports is a free Ajax space usage reporter with an easy-to-install explorer for remotely viewing disk usage on a web server. Its “rich client” layout and actions make it accessible to any end-user for a variety of reports. Only PHP (4 or 5) is necessary, no database needed.
(No Ratings Yet)We currently offer the File Transfer Protocol (FTP) as the main interface to the website files located on our systems. In addition we support encrypted FTP (Implicit and Explicit) if you need additional security when using FTP to transmit data. You can use FTP to upload and download your website files using the FTP login information that was provided in your welcome email (contact us if you lost this information). The FTP client software we suggest for our customers is “FileZilla“, which is available for multiple Operating Systems. If you want a mount point or drive letter so it looks like a local drive using FTP, then check out these software packages:
The only prerequisite we have is that “Passive Mode” is turned on, which is normally the default setting. We suggest using FTP with SSL so the connection is encrypted for security.
We do not offer a web based file manager that is available on a global basis due to security and availability concerns. If you wish to have a file manager available for your website, you can easily use FTP to upload your own file manager. Here is a list of 7 examples of file managers that are available:
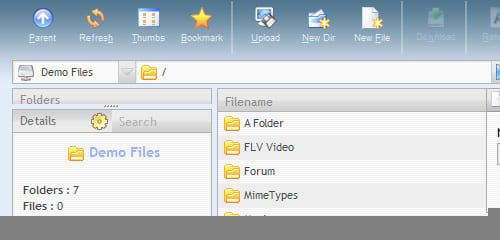
1. EXTPLORER
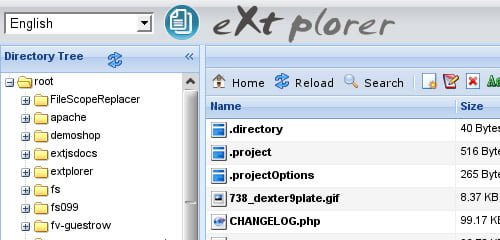
eXtplorer is a web-based File Manager. You can use it to. Features include:
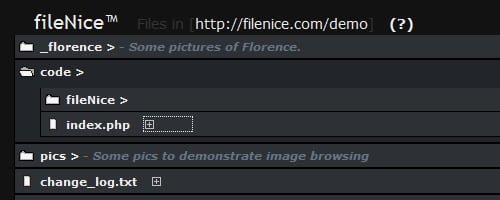
fileNice is a free php file browser, particularly useful if you have a ‘dump’ folder on your server where you regularly upload files and you want to be able to see what’s there.
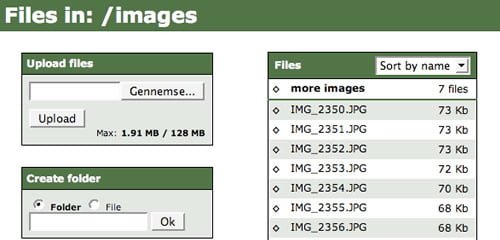
File Thingie is a small web-based file manager written in PHP. It is intended for those who need to give others access to a part of their server’s file system when FTP is not practical. Through File Thingie you and your users get access to the most common functions:
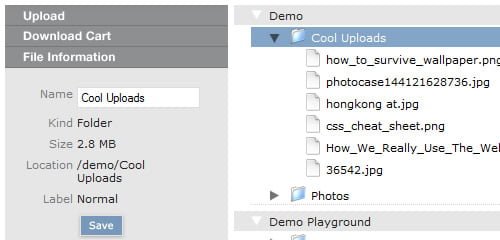
A MooTools based File-Manager for the web that allows you to (pre)view, upload and modify files and folders via the browser. Features include:
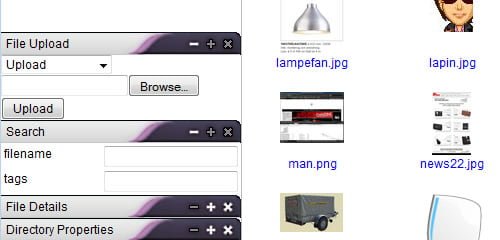
Relay is a wonderful piece of ajax code written with the aid of the prototype ajax toolkit. It does a wonderful job of uploading / downloading and managing files on your private server, let’s check out some of its features:
KFM is an online file manager which can be used on its own, or as a plugin for a rich-text editor such as FCKeditor or TinyMCE. KFM is Open Source, and you are free to use it in any project, whether free or commercial. Let’s check out some of its features: drag-and-drop everything, icon-view, list-view, plugins, image manipulations, slideshows, easy installation and upgrades, syntax-highlighting text editor, search engine, tagging, multi-lingual. plugins for mp3 playback, video playback.
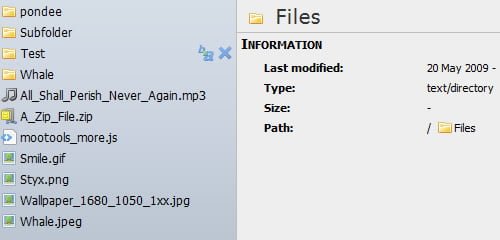
AjaXplorer is a free Ajax file manager with an easy-to-install file explorer for remotely managing files on a web server. Its “rich client” layout and actions make it accessible to any end-user for a variety of purposes: file management/sharing, photo gallery, code browsing, etc. Only PHP (4 or 5) is necessary, no database needed.
(No Ratings Yet)
This guide was built to serve as a comprehensive resource to using .htaccess. If you are completely new to using .htaccess — you might want to start with the first chapter “.htaccess Basics” below.
If you are searching for specific code samples or tutorials look at the navigation on the right-hand side of this page to jump directly to sub-sections within this page.
.htaccess Basics
What is .htaccess?
The .htaccess file is a configuration file that affects how a webserver responds to various requests. It is supported by several webservers, including the popular Apache software used by mosy commercial web hosting providers.
.htaccess files operate at the level of a directory, allowing them to override global configuration settings of .htaccess directives higher in the directory tree.
Why is it called .htaccess?
These files were first used to control user access on a per-directory basis.
Using a subset of Apache’s http.conf settings directives, it allowed a system administrator to restrict access to individual directories to users with a name and password specified in an accompanying .htpasswd file.
While .htaccess files are still used for this, they are also used for a number of other things which we’ll cover in this guide.
Where is the .htaccess file?
In theory, every folder (directory) on your server could have one. Generally, though, there is one in your web root folder — that’s the folder that holds all the content of your website, and is usually labeled something like Public_HTML or www.
If you have a single directory that contains multiple website subdirectories, there will usually be an .htaccess file in the main root (Public_HTML) directory and also one in each subdirectory (/sitename).
Why can’t I find my .htaccess file?
On most file systems, file names that begin with a dot ( . ) are hidden files. This means they are not typically visible by default.
But they aren’t hard to get to. Your FTP client or File Manager should have a setting for “show hidden files.” This will be in different places in different programs, but is usually in “Preferences”, “Settings”, or “Folder Options.” Sometime you’ll find it in the “View” menu.
What if I don’t have an .htaccess file?
First of all, make sure that you have turned on “show hidden files” (or its equivalent), so that you can be sure you actually don’t have one. Often, .htaccess files are created automatically, so you will usually have one. But this isn’t always the case.
If you really don’t have one, you can easily create one:
Start a new file in a plain text editor.
Save it in ASCII format (not UTF-8 or anything else) as .htaccess
.
Make sure that it isn’t htaccess.txt or something like that. The file should have only the name .htaccess with no additional file extension.
Upload it to the appropriate directory via FTP or your browser-based file manager.
Error Handling
Using .htaccess files to specify error documents is very simple, one of the simplest things you can do with this feature.
What is an error code?
When a request is made to a web server, it tries to respond to that request, usually by delivering a document (in the case of HTML pages), or by accessing an application and returning the output (in the case of Content Management Systems and other web apps).
If something goes wrong with this, an error is generated. Different types of errors have different error codes. You are probably familiar with the 404 error, which is returned if the document cannot be found on the server.
There are many other error codes that a server can respond with.
Client Request Errors
400 — Bad Request
401 — Authorization Required
402 — Payment Required (not used yet)
403 — Forbidden
404 — Not Found
405 — Method Not Allowed
406 — Not Acceptable (encoding)
407 — Proxy Authentication Required
408 — Request Timed Out
409 — Conflicting Request
410 — Gone
411 — Content Length Required
412 — Precondition Failed
413 — Request Entity Too Long
414 — Request URI Too Long
415 — Unsupported Media Type.
Server Errors
500 — Internal Server Error
501 — Not Implemented
502 — Bad Gateway
503 — Service Unavailable
504 — Gateway Timeout
505 — HTTP Version Not Supported.
What happens by default?
If you don’t specify any type of error handling, the server will simply return the message to the browser, and the browser will display a generic error message to the user. This is usually not ideal.
Specifying Error Documents
Create an HTML document for each error code you want to handle. You can name these whatever you like, but it’s helpful to name them something that will help you remember what they’re for, like not-found.html or simply 404.html.
Then, in the .htaccess file, specify which document to use with each type of error.
ErrorDocument 400 /errors/bad-request.html
ErrorDocument 401 /errors/auth-reqd.html
ErrorDocument 403 /errors/forbid.html
ErrorDocument 404 /errors/not-found.html
ErrorDocument 500 /errors/server-err.html
Notice that each directive is placed on its own line.
And that’s it. Very simple.
Alternatives to .htaccess for error handling
Most Content Management Systems (CMS) like WordPress and Drupal, and most web apps, will have their own way of handling most of these errors codes.
Password Protection With .htaccess
The original purpose of .htaccess files was to restrict access to certain directories on a per-user basis (hence the name, hyper text access). So we’ll look at that first.
.htpasswd
Usernames and passwords for the .htaccess system are stored in a file name .htpasswd.
These are stored each on a single line, in the form:
username:encryptedpassword
for example:
johnsmith:F418zSM0k6tGI
It’s important to realize that the password stored in the file isn’t the actual password used to log in. Rather it is a cryptographic hash of the password.
This means that the password has been run through an encryption algorithm, and the result is stored. When a user logs in, the plain-text password is entered and run through the same algorithm. If the input is the same, the passwords match and the user is granted access.
Storing passwords this way makes them more secure — if someone were to gain access to your .htpasswd file, they would only see the hashed passwords, not the originals. And there is no way to reconstruct the originals from the hash — it is a one way encryption.
Several different hashing algorithms can be used:
Secure Algorithms — Use one of
these
bcrypt — This is the most secure, but also the slowest to compute. It is supported by Apache and Nginx.
md5 — This is the default hashing algorithm used by current versions of Apache. It is not supported by Nginx.
Insecure Algorithms — Do not use
these
crypt() — This used to be the default hashing function, but it is not very secure.
SHA and Salted SHA.
Creating usernames and passwords on the command line
You can create an .htpasswd file, and add username-password pairs to it, directly from the command line or SSH terminal.
The command for dealing with the .htpasswd file is simply htpasswd.
To create a new .htpasswd file, use the command with the -c option (for create), then type the path to the directory (not the URL, the actual path on the server). You can also include a user you want to add.
> htpasswd -c /usr/local/etc/.htpasswd johnsmith
This creates a new .htpasswd file in the /etc/ directory, and adds a record for a user named johnsmith. You will be prompted for a password, which will also be stored, using the md5 encryption.
If there is already an .htpasswd file at the specified location, a new one is not created — the new user is simply appended to the existing file.
If you’d prefer to use the bcrypt hashing algorithm, use the -b option.
Password hashing without the command line
If you don’t feel comfortable using the command line or SSH terminal (or if you don’t have access to it for some reason), you can simply create an .htpasswd file and populate it using a plain text editor, and upload it via FTP or file manager.
But then you’ll need to encrypt your passwords somehow, since the htpasswd command was taking care of that for you.
There are many .htpasswd encryption utilities available online. The best one is probably the htpasswd generator at Aspirine.org.
This gives you several options for hashing algorithm and password strength. You can simply copy-and-paste the output from there into your .htpasswd file.
Where to keep your .htpasswd file
You don’t need to have a separate .htpasswd file for every .htaccess file. In fact, you shouldn’t. Under most normal circumstances, you should have one for your entire web hosting account or main server directory.
The .htpasswd file should not be in a publicly accessible directory — not Public_HTML or www or any subdirectory. It should be above those, in a folder that is only accessible from the server itself.
How to use .htpasswd with .htaccess
Each directory can have its own .htaccess file, with its own set of users which are allowed to access it.
If you want any one (including non-logged-in users) to access the directory and its files, simply do nothing — that is the default.
To restrict access you need to add the following to the .htaccess file:
AuthUserFile /usr/local/etc/.htpasswd
AuthName “Name of Secure Area”
AuthType Basic
The
In the above example, any valid user can access files. If you want to restrict access to a specific user or few users, you can name them.
AuthUserFile /usr/local/etc/.htpasswd
AuthName “Name of Secure Area”
AuthType Basic
require user janedoe
The group file, which could be named (for example) .htgroups looks like this:
admin: johnsmith janedoe
staff: jackdoe cindysmith
Then you can specify it in your .htaccess file:
AuthUserFile /usr/local/etc/.htpasswd
AuthGroupFile /usr/local/etc/.htgroup
AuthName “Admin Area”
AuthType Basic
Using .htaccess and .htpasswd to resrict access to certain files on your server only really makes sense if you have a lot of static files. The feature was developed when web sites were usually a collection of HTML documents and related resources.
If you are using a content management system (CMS) like WordPress or Drupal, you can use the built-in user management features to restrict or grant access to content.
Enabling Server Side Includes (SSI)
What are Server Side Includes?
SSI, or Server Side Includes, is a light-weight scripting language used primarily to embed HTML documents into other HTML documents.
This makes it easy to re-use common elements, such as headers, footers, sidebars, and menus. You can think of it as a precursor to today’s templating and content management systems.
SSI also has conditional directives (if, else, etc.) and variables, making it a complete, if somewhat hard to use, scripting language. (Typically, any project more complicated than a handful of includes will cause a developer to choose a more robust language like PHP or Perl.)
Enabling SSI
Some web hosting servers will have Server Side Includes enabled by default. If not, you can enable it with your .htaccess file, like so:
AddType text/html .shtml
AddHandler server-parsed .shtml
Options Indexes FollowSymLinks Includes
This should enable SSI for all files that have the .shtml extension.
SSI on .html files
If you want to enable SSI parsing on .html files, you can add a directive to accomplish that:
AddHandler server-parsed .html
The benefit of doing this is that you can use SSI without letting the world know you are using it. Also, if you change implementations in the future, you can keep your .html file extensions.
The downside of this is that every .html file will be parsed with SSI. If you have a lot of .html files that don’t actually need any SSI parsing, this can introduce a lot of unneeded server overhead, slowing down your page load times and using up CPU resources.
SSI on your Index page
If you don’t want to parse all .html files, but you do want to use SSI on your index (home) page, you’ll need to specify that in your .htaccess file.
That’s because when the web server is looking for a directory’s index page, it looks for index.html, unless you tell it otherwise.
If you aren’t parsing .html files, you’ll need your index page to be named index.shtml for SSI to work, and your server doesn’t know to look for that by default.
To enable that, simply add:
DirectoryIndex index.shtml index.html
This alerts the web server that the index.shtml file is the main index file for the directory. The second parameter, index.html is a backup, in case index.shtml can’t be found.
IP Blacklisting and IP Whitelisting
You can use .htaccess to block users from a specific IP address (blacklisting). This is useful if you have identified individual users from specific IP addresses which have caused problems.
You can also do the reverse, blocking everyone except visitors from a specific IP address (whitelisting). This is useful if you need to restrict access to only approved users.
Blacklisting by IP
To block specific IP addresses, simply use the following directive, with the appropriate IP addresses:
order allow,deny
deny from 111.22.3.4
deny from 789.56.4.
allow from all
The first line states that the allow directives will be evaluated first, before the deny directives. This means that allow from all will be the default state, and then only those matching the deny directives will be denied.
If this was reversed to order deny,allow, then the last thing evaluated would be the allow from all directive, which would allow everybody, overriding the deny statements.
Notice the third line, which has deny from 789.56.4. — that is not a complete IP address. This will deny all IP addresses within that block (any that begin with 789.56.4).
You can include as many IP addresses as you like, one on each line, with a deny from directive.
Whitelisting by IP
The reverse of blacklisting is whitelisting — restricting everyone except those you specify.
As you may guess, the order directive has to be reversed, so that that everyone is first denied, but then certain addresses are allowed.
order deny,allow
deny from all
allow from 111.22.3.4
allow from 789.56.4.
Domain names instead of IP addresses
You can also block or allow users based on a domain name. This can be help block people even as they move from IP address to IP address. However, this will not work against people who can control their reverse-DNS IP address mapping.
order allow,deny
deny from example.com
allow from all
This works for subdomains, as well — in the previous example, visitors from xyz.example.com will also be blocked.
Block Users by Referrer
A referrer is the website that contains a link to your site. When someone follows a link to a page on your site, the site they came from is the referrer.
This doesn’t just work for clickable hyperlinks to your website, though.
Pages anywhere on the internet can link directly to your images (“hotlinking”) — using your bandwidth, and possibly infringing on your copyright, without providing any benefit to you in terms of traffic. They can also hotlink to your CSS files, JS scripts, or other resources.
Most website owners are okay with this when happens just a little bit, but sometimes this sort of thing can turn into abuse.
Additionally, sometimes actual in-text clickable hyperlinks are problematic, such as when they come from hostile websites.
For any of these reasons, you might want to block requests that come from specific referrers.
To do this, you need the mod_rewrite module enabled. This is enabled by default for most web hosts, but if it isn’t (or you aren’t sure) you can usually just ask your hosting company. (If they can’t or won’t enable it, you might want to think about a new host.)
The .htaccess directives that accomplish referrer-based blocking rely on the mod_rewrite engine.
The code to block by referrer looks like this:
RewriteEngine on
RewriteCond % ^http://.*example.com [NC,OR]
RewriteCond % ^http://.*anotherexample.com [NC,OR]
RewriteCond % ^http://.*onemoreexample.com [NC]
RewriteRule .* – [F]
This is a little tricky, so lets walk through it.
The first line, RewriteEngine on, alerts the parser that a series of directives related to rewrite is coming.
The next three lines each block one referring domain. The part you would need to change for your own use is the domain name (example) and extension (.com).
The backward-slash before the .com is an escape character. The pattern matching used in the domain name is a regular expression, and the dot means something in RegEx, so it has to be “escaped” using the back-slash.
The NC in the brackets specifies that the match should not be case sensitive. The OR is a literal “or”, and means that there are other rules coming. (That is — if the URL is this one or this one or this one, follow this rewrite rule.)
The last line is the actual rewrite rule. The [F] means “Forbidden.” Any requests with a referrer matching the ones in the list will fail, and deliver a 403 Forbidden error.
Blocking Bots and Web Scrapers
One of the more annoying aspects of managing a website is discovering that your bandwidth is being eaten up by non-human visitors — bots, crawlers, web scrapers.
These are programs that are designed to pull information out of your site, usually for the purpose of republishing it as part of some low-grade SEO operation.
There, of course, legitimate bots — like those from major search engines. But the rest are like pests that just eat away at your resources and deliver no value to you whatsoever.
There are several hundred bots identified. You will never be able to block all of them, but you can keep the activity down to a dull roar by blocking as many as you can.
Here is a set of rewrite rules which will block over 400 known bots, compiled by AskApache
Specifying a Default File for a Directory
When a request is made to a web server for a URL which does not specify a file name, the assumption built into most web servers is that the URL refers to a directory.
So, if you request http://example.com, Apache (and most other web servers) is going look in the root directory for the domain (usually /Public_HTML or something similar, but perhaps /example-com) for the default file.
The default file, by default, is called index.html. This goes way back to the beginning of the internet when a website was just a collection of documents, and the “home” page was usually an index of those documents.
But you might not want index.html to be the default page. For example, you might need a different file type, like index.shtml, index.xml, or index.php.
Or you might not think of your home page as an “index,” and want to call it something different, like home.html or main.html.
Setting the Default Directory Page
.htaccess allows you to set the default page for a directory easily:
DirectoryIndex [filename here]
If you want your default to be home.html it’s as easy as:
DirectoryIndex home.html
Setting Multiple Default Pages
You can also specify more than one DirectoryIndex:
DirectoryIndex index.php index.shtml index.html
The way this works is that the web server looks for the first one first. If it can’t find that, it looks for the second one, and so on.
Why would you want to do this? Surely you know which file you want to use as your default page, right?
Remember that .htaccess affects its own directory, and every subdirectory until it is overridden by a more local file. This means that an .htaccess file in your root directory can provide instructions for many subdirectories, and each one might have its own default page name.
Being able to place those rules in a single .htaccess file in the root means that you don’t have to duplicate all the other directives in the file at every directory level.
URL Redirects and URL Rewriting
One of the most common uses of .htaccess files is URL redirects.
URL redirects should be used when the URL for a document or resource has changed. This is especially helpful if you have reorganized your website or changed domain names.
301 vs. 302
From a browser standpoint, there are two types of redirects, 301 and 302. (These numbers refer to the error code generated by the web server.)
301 means “Permanently Moved,” while 302 means “Moved Temporarily.” In most cases, you want to use 301. This preserves any SEO equity the original URL had, passing it on to the new page.
It also will cause most browsers to update their bookmarks. Most browsers will also cache the old-to-new mapping, so they will simply request the new URL when a link or user attempts to access the original. If the URL has changed permanently, these are all desirable results.
There’s very little reason to use 302 redirects, since there’s usually very little reason to temporarily change a URL. Changing a URL ever is undesirable, but is sometimes necessary. Changing it temporarily, with the plan to change it back later, is a bad idea and is almost always avoidable.
All the examples in this section will use the 301 redirect.
Redirect vs. Rewrite
There are two different ways to “change” a URL with .htaccess directives — the Redirect command and the mod_rewrite engine.
The Redirect command actually sends a redirect message to the browser, telling it what other URL to look for.
Typically, the mod_rewrite tool “translates” one URL (the one provided in a request) into something that the file system or CMS will understand, and then handles the request as if the translated URL was the requested URL.
When used this way, the web browser doesn’t notice that anything happened — it just receives the content it asked for.
The mod_rewrite tool can also be used to produce 301 redirects that work the same way as the Redirect command, but with more options for rules — mod_rewrite can have complex pattern matching and rewriting instructions, which Redirect cannot take advantage of.
Basic Page Redirect
To redirect one page to another URL, the code is:
Redirect 301 /relative-url.html http://example.com/full-url.html
This single-line command has four parts, each separated with a single space:
The Redirect command
The type of redirect ( 301 – Moved Permanently )
The relative URL of the original page
The full and complete URL of the new page.
The relative URL is relative to the directory containing the .htaccess file, which is usually the web root, or the root of the domain.
So if http://example.com/blog.php had been moved to http://blog.example.com, the code would be:
Redirect 301 /blog.php http://blog.example.com
Redirecting a large section
If you have moved your directory structure around, but kept your page names the same, you might want to redirect all requests for a certain directory to the new one.
Redirect 301 /old-directory http://example.com/new-directory
Redirecting an entire site
What if you entire site has moved to a new URL? Easy.
Redirect 301 / http://newurl.com
Redirecting www to non-www
Increasingly, websites are moving away from the www subdomain.
It’s never really been necessary, but it was a holdover from the days when you most people who operated a website were using a server to store lots of their own documents, and the www or “world wide web” directory was used for content they wanted to share with others.
These days, some people use it, and some people don’t. Unfortunately, some users still automatically type www. in front of every URL out of habit. If you’re not using www, you want to make sure that these requests land in the right place.
To do this, you’ll need to use the mod_rewrite module, which is probably already installed on your web host.
Options +FollowSymlinks
RewriteEngine on
RewriteCond % ^www.example.com [NC]
RewriteRule ^(.*)$ http://example.org/$1 [R=301,NC]
Be careful!
A lot of other .htaccess and mod_rewrite guides offer some variation of the following code to accomplish this:
Options +FollowSymlinks
RewriteEngine on
RewriteCond % !^example.com [NC]
RewriteRule ^(.*)$ http://example.org/$1 [R=301,NC]
Do you see the problem with that?
It redirects all subdomains to the primary domain. So not just www.example.com, but also blog.example.com and admin.example.com and anything else. This is probably not the behavior you want.
Redirecting to www
But what if you are using the www subdomain?
You should probably set up a redirect to make sure people get to where they’re trying to go. Especially now that fewer people are likely to automatically add that www to the beginning of URLs.
You just reverse the above code.
RewriteEngine On
RewriteCond % ^example.com [NC
RewriteRule ^(.*) http://www.website.com/$1 [R=301,NC]
Something you shouldn’t do
Several guides on .htaccess redirects include instructions on how to make 404 errors redirect to the home page.
This is a good example of how just because you can do something, it doesn’t mean you should do something.
Redirecting 404 errors to the site’s homepage is a terrible idea. It confuses visitors, who can’t figure out why they are seeing the front page of a site instead of a proper 404 error page.
All websites should have a decent 404 page which clearly explains to the user that the content couldn’t be found and, ideally, offers some search features to help the user find what they were looking for.
Why use .htaccess instead of other alternatives?
You can set up redirect in PHP files, or with any other type of server-side scripting. You can also set them up within your Content Management System (which is basically the same thing).
But using .htaccess is usually the fastest type of redirect. With PHP-based redirects, or other server-side scripting languages, the entire request must be completed, and the script actually interpreted before a redirect message is sent to the browser.
With .htaccess redirects, the server responds directly to the request with the redirect message. This is much faster.
You should note, though — some content management systems actually manage redirects by updating the .htaccess programatically. WordPress, for example, has redirect plugins that work this way. (And WP’s pretty URL system does this as well.)
This gives you the performance of using .htaccess directly, while also giving you the convenience of management from within your application.
Hiding Your .htaccess File
There is no reason that someone should be able to view your .htaccess file from the web. It is never a needed document.
Moreover, there are some big reasons you should definitely not want people to see your .htaccess file. The biggest issue is that if you are using an .htpasswd file, its location is spelled out in the .htaccess file. Knowing where to find it makes it easier to find.
Moreover, as a general rule, you don’t want to provide the public with details about your implementation.
Rewrite rules, directory settings, security — all of the things that you use .htaccess for — it is a good security practice to hide all of this behind-the-scenes at your web server. The more a hacker can learn about your system, the easier it is to compromise it.
It is very easy to hide your .htaccess file from public view. Just add the following code:
order allow,deny
deny from all
Enabling MIME types
MIME types are file types. They’re called MIME types because of their original association with email (MIME stands for “Multipurpose Internet Mail Extensions”). They aren’t just called “file types” because MIME implies a specific format for specifying the file type.
If you’ve ever authored an HTML document, you’ve like specified a MIME type, even if you didn’t know it:
(No Ratings Yet)The SQL statement you need to run on the MySQL database to change your personal database user password is:
SET PASSWORD = PASSWORD(‘biscuit’);
That will set the password for the current user your logged in as to “biscuit”. You can issue this SQL command by using our MySQL editor which is available at “https://database.imageway.com“.
Rate This Entry:
(No Ratings Yet)![]() Loading...
Loading...
All rights reserved. Copyright © 2000-2025 Imageway, LLC.